
Cooking Methods and Kitchen Tips That Save Actual Money and Time
Learning new cooking methods and kitchen hacks to use at meal time can be fun and exciting, but it can also save you a lot on your weekly grocery bill while making life so much easier. I love learning and sharing new kitchen tricks and ways of cooking food that save time and money and […]
How to Grow Creeping Jenny
Today, I’ll share my tips for growing creeping jenny, one of my favorite plants for brightening up dull or dark spots in the garden! Creeping Jenny has been one of my very favorite plants to grow over the last few years. Actually, I think that this is really one of those “if you know, you […]

Salted Chocolate Chip Cookies
The perfect chewy chocolate chip cookie, elevated just a little bit. Here’s how to make my new favorite salted chocolate chip cookies! Let me tell you, if you’re looking for a truly indulgent cookie experience, look no further. These salted chocolate chip cookies are so great because, first of all, the actual chocolate chip cookie […]
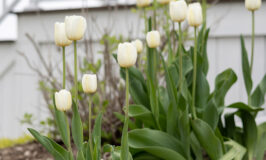
How to Plant Tulip Bulbs for Beautiful Spring Blooms
Every garden deserves a little early spring cheer and adding spring flowering bulbs is an easy way to do it. Here’s how to plant tulip bulbs. As the years go by, I find my opinions about spring flowers getting stronger and stronger. More specifically, I find I’m more and more in favor of the idea […]
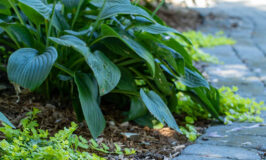
How and When to Transplant Hostas
Once you add one hosta to your garden, you’ll definitely want more and more. If you’re patient enough and are willing to put in a bit of work, you won’t have to pay a thing for them. Here’s how and when to transplant hostas by dividing. Hostas are very common in a lot of traditional-style […]

How to Propagate Pothos Plants
Once you have one pothos plant, it’s easy to propagate it over and over again to create more for yourself and to share with friends and family. Here’s how to propagate pothos plants. I’m still really figuring out which houseplants are my favorites and which I don’t care for as much, but like most people, […]

How to Update a Drop Ceiling Quickly and Easily
Drop ceilings can be a practical choice, but they can also be eyesores in certain rooms of your home. Here’s how to complete an easy drop-ceiling update that will create a beautiful feature for any space. We were more than a little annoyed with the suspended ceilings in our living and dining rooms when we […]

Peanut Butter Chocolate Chip Cookies
These peanut butter chocolate chip cookies are the perfect cookie variation to make for all the chocolate peanut butter lovers in your life, of which there are probably many. Is there any more perfect flavor combination than chocolate and peanut butter? Many people would definitely say “absolutely not”. Chris has always been a big fan […]
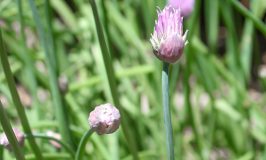
How to Grow Chives
Over the last few years, I’ve learned a few key things about growing chives successfully in my garden, so in today’s post, we’ll discuss how to grow chives. Chives are some of my favorite herbs to grow because they thrive so easily, they’re one of the first plants to come up in the spring, and […]

Things to do in Toronto With Older Kids
A trip to Toronto can be so fun and interesting for people of all ages, but you might be at a loss for activity ideas if your kids are no longer quite so little. Here are some of our favorite things to do in Toronto with older kids. We lived in Toronto when our oldest, […]
Five Things on a Friday – 4/5/24
Happy Friday! I hope spring is definitely starting to show up for you in your little corner of the world. If it is, I hope you’ll have the chance to get out and enjoy it this weekend. Things have been busy around here, so let’s get caught up! I’m starting to plan out a few […]

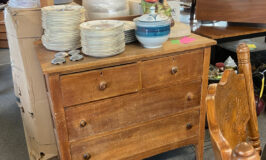
What to Buy From the Habitat for Humanity ReStore
Have you ever wondered just how people find these great items to use in their homes at Habitat for Humanity ReStore locations? It helps to know what to look for. Here’s what to buy from the ReStore! Walking into a Habitat for Humanity ReStore location can be a bit of an overwhelming experience. There’s just […]
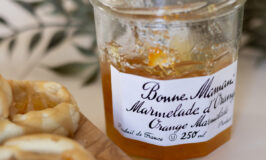
Orange Marmalade Thumbprint Cookies With Spicy Ginger Glaze
These orange marmalade thumbprint cookies are a bright, flavorful, and unexpected little treat to pair with tea and coffee or to include on a dessert tray. I love an interesting thumbprint cookie variation and these orange marmalade thumbprint cookies definitely fit the bill. I get so much satisfaction out of finding a way to use […]
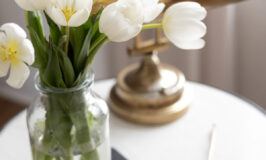
The Vodka Vase Trick to Prevent Drooping Tulips
Out in the garden or in cut-flower arrangements for your home, nothing better announces the arrival of spring the way beautifully blooming tulips do. Extend the vase life of your blooms and prevent drooping tulips with the vodka trick! Depending on where you live, you’re either right in the middle of tulip season right now […]
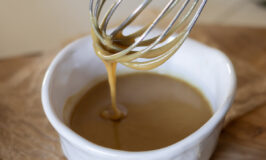
Sweet and Spicy Ginger Glaze Recipe for Baking
This sweet and spicy confectioner’s sugar ginger glaze recipe is the perfect little burst of flavor for cookies, cakes, and muffins. This ginger glaze recipe was originally a bit of an afterthought, but it really turned out to be the star of the show with a batch of cookies I made recently. This glaze is […]
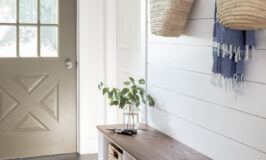
Modern Thrift Store Decorating: What I Always Look For
I find some of my favorite pieces at thrift stores! Here are my tips for modern thrift store decorating and what I always look for when I visit the thrift store lately. It never fails. When I’m out styling a home for a shoot, the homeowner or the designer I’m working with will always compliment […]
6 Ways That Cleaning House This Spring Can Make You Happier and Healthier
For those planning on cleaning their house this spring, the benefits may be more than just tidier spaces and sparkling surfaces. If seasonal house cleaning and decluttering seem merely a tedious chore for some homeowners, they may want to rethink how and why they approach their cleaning house jobs this spring. Research has shown that […]
Cobbletog Antiques in London, Ontario
Cobbletog Antiques in London, Ontario is an amazing vintage emporium to visit for an afternoon of treasure hunting. Today I’m sharing a little about my visit and my tips for making the most of your time at this wonderful shop. I discovered Cobbletog Antiques in London, Ontario, a few weeks ago, and I was just […]

How to Clean a Lampshade
Lampshades are a necessary part of home decor and lighting plans, but they can also be notorious dust collectors. Today I’m sharing my favorite little trick for how to clean a lampshade quickly and easily. Sometimes, I think cleaning is fun. There. I said it. I usually do a quick bit of dusting and house […]

Bookshelf Wealth is the Trend That Needs to Not Be Just a Trend
The term “bookshelf wealth” is being mentioned all over social media lately and the cozy, welcoming look has established itself as one of the predominant trends of the year. Here’s why I think this aesthetic is here to stay. Bookshelf wealth, the maximalist interior-design trend that’s all about the beauty of an overstuffed bookshelf piled […]