This post may contain affiliate links. Thank you for your support.
In today’s post I’ll share the details of how I whitewashed the faux stone wall behind my new desk nook to brighten up the whole space. Here’s how to whitewash a stone wall.
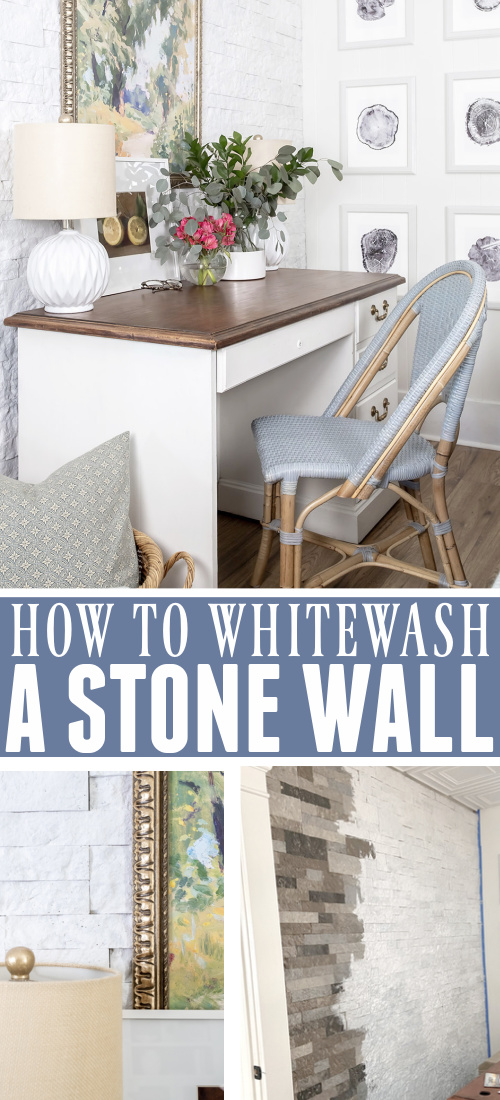
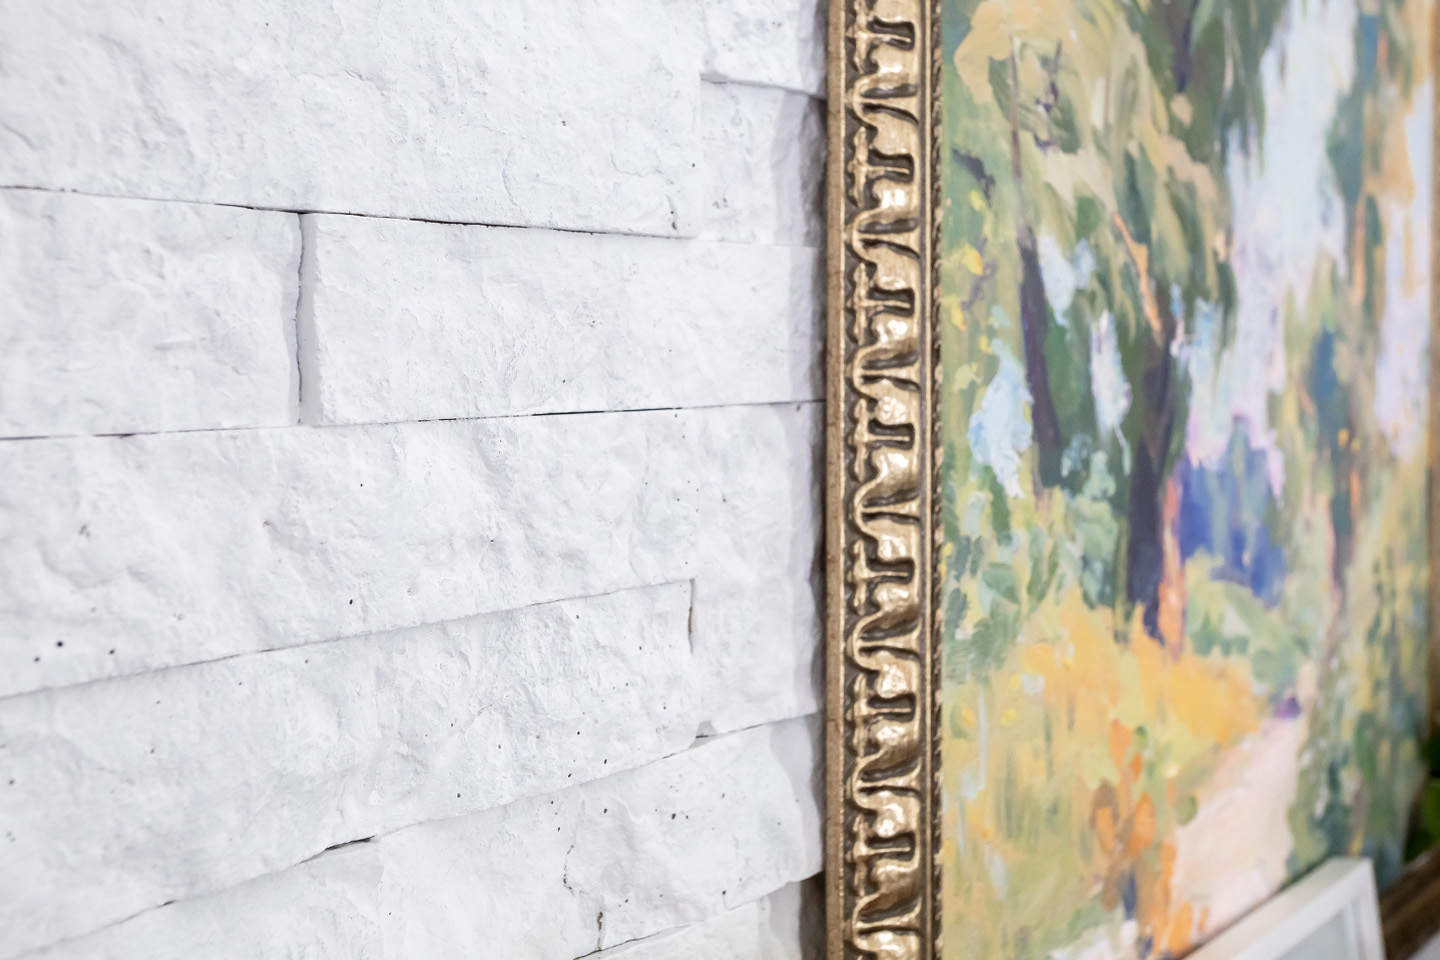
We installed this faux stone wall in our living room a few years ago and I loved how it immediately brought a little character to a room that was otherwise pretty “blah”. As time went on though, I started to feel like it was really dark. Actually, I feel like all of my choices from 4-8 years ago were pretty dark. I’m not really sure what happened there. I guess it seemed practical? Well, when I decided that I would actually start working at this desk nook in our living room and that I wanted it to be cheerful, I knew I’d have to do something about brightening up this wall. I wasn’t sure if paint was really even a viable option on this faux stone wall, but it ended up working out beautifully, just like with a regular stone wall, and today I’m sharing the process. Here’s how to whitewash a stone wall!
![]()
I’m sharing this post today as my monthly contribution to the Thrifty Style Team. The magic of paint never ceases to amaze and it’s always a very budget-friendly solution. Be sure to check out the other team members’ projects from this month as well!
DIY Beautify – Blue and White Decoupage Chargers
2 Bees In A Pod – Painted Frame Makeover
Postcards From The Ridge – Simple Spring Mantel with Milk Glass Vases and Daffodils
The Creek Line House – How to Whitewash a Stone Wall
The How To Home – Easy DIY Paper Bunny Garland
The Tattered Pew – Flea Market Style Spring Centerpiece
Sweet Pea – Easy to make Spring Wreath
What Meegan Makes – Champagne Bucket Spring Floral Arrangement
Cottage At The Crossroads – DIY Bunny Garland
I Should Be Mopping The Floor – DIY Potted Hyacinth Bulbs
Lora B. Create & Ponder – Simple Garden Theme Decor DIY
White Arrows Home – Nautical Candle Holders
Our Crafty Mom – How To Tint Mason Jars With Food Coloring
Chas’ Crazy Creations – How To Stencil On Wood
Tools Needed for Whitewashing a Stone Wall
- A medium size bucket or plastic container, maybe about 1/2 gallon to give you room to work
- A wide, soft-bristle paint brush
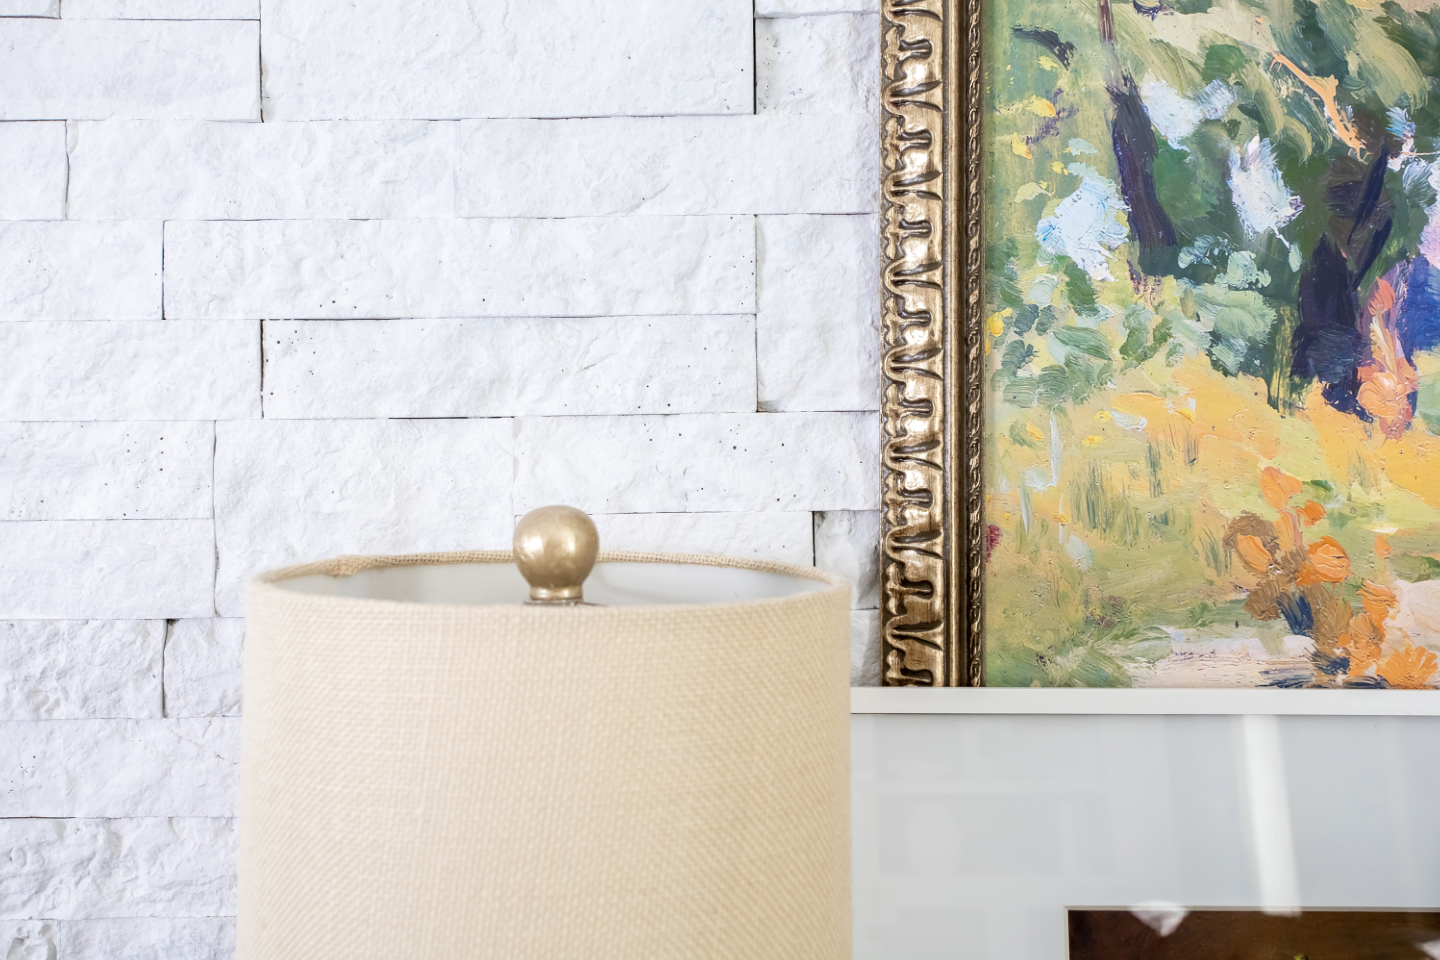
- Chalky finish paint (I used this one here. It’s a very clean white and a bit cooler than the white that I always use on my walls and trim, an old Martha Stewart color called “Picket Fence”.)
- Water
- A good drop cloth
How to Whitewash a Stone Wall
First of all, here’s how this little corner looked before. This was one day during remote learning in January where Jack was getting ready to share a bunch of his LEGO creations. 🙂 The corner was cozy, but dark and I definitely envisioned something a bit brighter. Whitewashing was in order!

Start out by laying your drop cloth down in front of stone that you’ll be painting. I’m usually not a huge stickler for using drop cloths when I paint, but with this method, it’s absolutely necessary.
In your bucket, mix together 1 part water to 1 part paint. I used about half of the quart of paint and it ended up being more than enough for the whole wall. A little goes a long way.
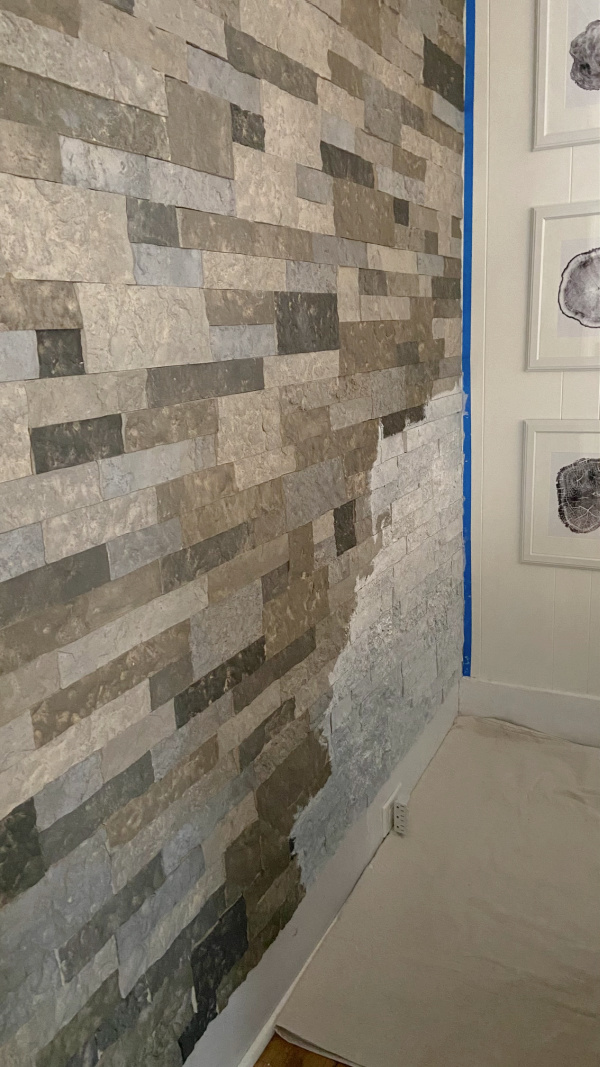
Begin working the paint into the stone. I was able to mostly paint as normal and then go back over each section to fill in any areas where the paint missed, but there weren’t many. The watered down paint really manages to get into all of the little nooks and crannies and the fact that it’s a chalky finish paint means that you also get pretty great coverage, even when it’s watered down.
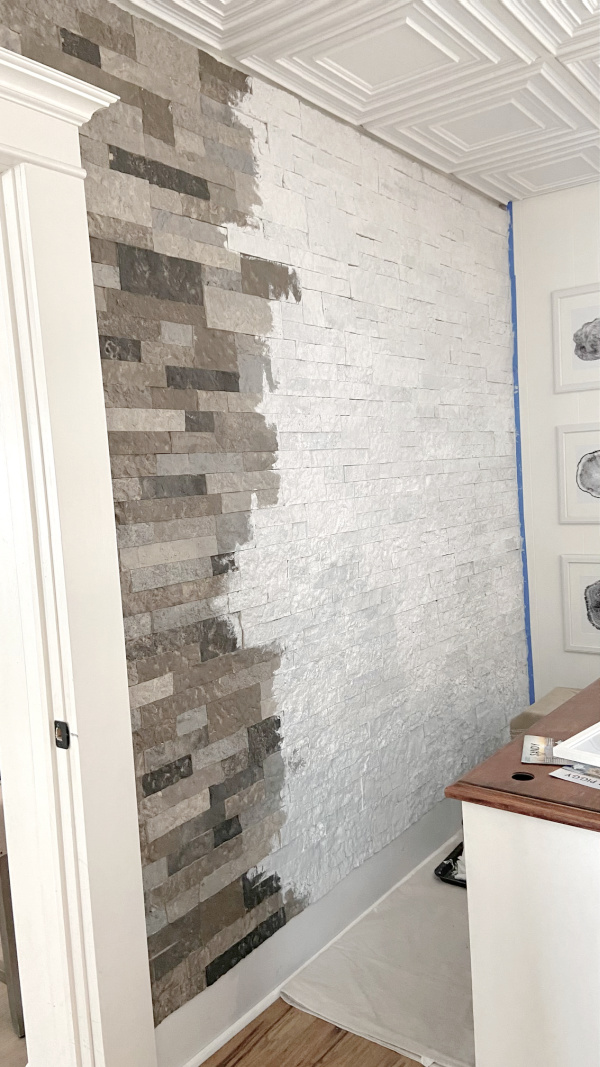
Once I’d covered the entire wall, I went back over and did a second coat, which went by much more quickly because the coverage was so great on the first coat. I was worried that this project was going to be a nightmare and that I’d need a million coats of paint, but it was actually really easy and satisfying to do.
Here’s how it turned out!
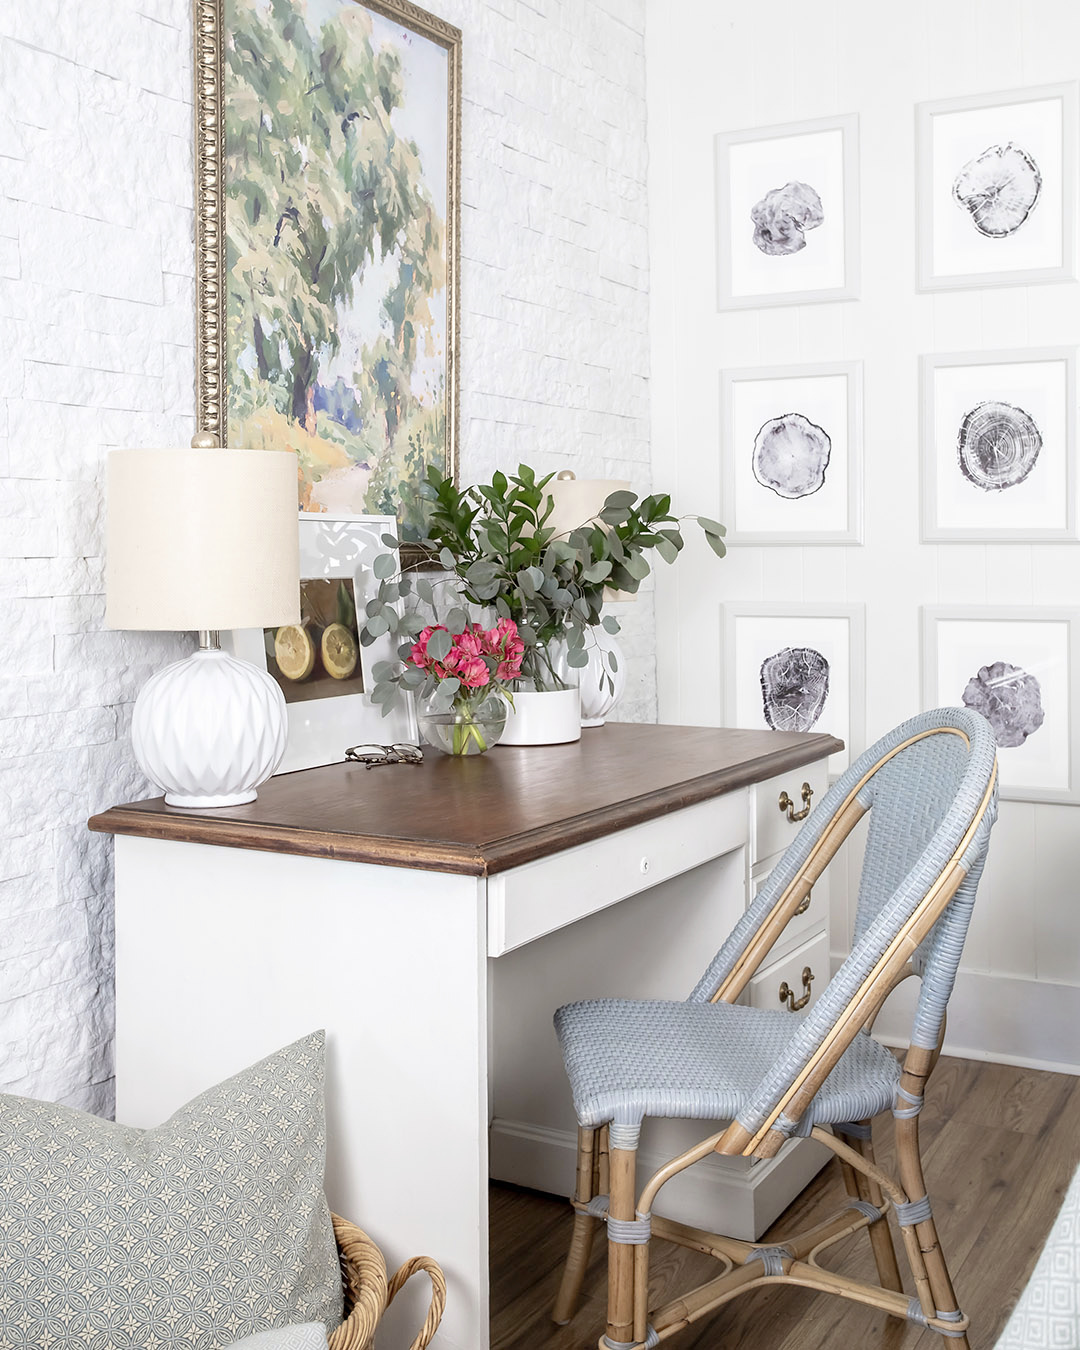
I don’t regret painting over that stone for one second. I just love this little corner of the house now.
MORE IDEAS LIKE THIS
- DIY Built-In Living Room Shelves and Fireplace
- Our IKEA Farmhouse Sink – 5 Years Later
- Inexpensive Faux Board and Batten Wall
- Easy, High-Impact Home Improvements That You’ve Been Overlooking
- The Creek Line House DIY and Renovating Archives
This post contains affiliate links.

Courtenay Hartford is the author of creeklinehouse.com, a blog based on her adventures renovating a 120-year-old farmhouse in rural Ontario, Canada. On her blog, Courtenay shares interior design tips based on her own farmhouse and her work as founder and stylist of the interior photography firm Art & Spaces. She also writes about her farmhouse garden, plant-based recipes, family travel, and homekeeping best practices. Courtenay is the author of the book The Cleaning Ninja and has been featured in numerous magazines including Country Sampler Farmhouse Style, Better Homes and Gardens, Parents Magazine, Real Simple, and Our Homes.
- Courtenay Hartford
- Courtenay Hartford
- Courtenay Hartford
- Courtenay Hartford
- Courtenay Hartford
- Courtenay Hartford
- Courtenay Hartford
- Courtenay Hartford
- Courtenay Hartford
- Courtenay Hartford
- Courtenay Hartford
- Courtenay Hartford
- Courtenay Hartford
- Courtenay Hartford
- Courtenay Hartford
- Courtenay Hartford
- Courtenay Hartford
- Courtenay Hartford
- Courtenay Hartford
- Courtenay Hartford
- Courtenay Hartford
- Courtenay Hartford
- Courtenay Hartford
- Courtenay Hartford
- Courtenay Hartford
- Courtenay Hartford
- Courtenay Hartford
- Courtenay Hartford
- Courtenay Hartford
- Courtenay Hartford
- Courtenay Hartford
- Courtenay Hartford
- Courtenay Hartford
- Courtenay Hartford
- Courtenay Hartford
- Courtenay Hartford
- Courtenay Hartford
- Courtenay Hartford
- Courtenay Hartford
- Courtenay Hartford
- Courtenay Hartford
- Courtenay Hartford
- Courtenay Hartford
- Courtenay Hartford
- Courtenay Hartford
- Courtenay Hartford
- Courtenay Hartford
- Courtenay Hartford
- Courtenay Hartford
- Courtenay Hartford
- Courtenay Hartford
- Courtenay Hartford
- Courtenay Hartford
- Courtenay Hartford
- Courtenay Hartford
- Courtenay Hartford
- Courtenay Hartford
- Courtenay Hartford
- Courtenay Hartford
- Courtenay Hartford
- Courtenay Hartford
- Courtenay Hartford
- Courtenay Hartford
- Courtenay Hartford
- Courtenay Hartford
- Courtenay Hartford
- Courtenay Hartford
- Courtenay Hartford
- Courtenay Hartford
- Courtenay Hartford
- Courtenay Hartford
- Courtenay Hartford
- Courtenay Hartford
- Courtenay Hartford
- Courtenay Hartford
- Courtenay Hartford
- Courtenay Hartford
- Courtenay Hartford
- Courtenay Hartford
- Courtenay Hartford
- Courtenay Hartford
- Courtenay Hartford
- Courtenay Hartford
- Courtenay Hartford
- Courtenay Hartford
- Courtenay Hartford
- Courtenay Hartford
- Courtenay Hartford
- Courtenay Hartford
- Courtenay Hartford
- Courtenay Hartford
- Courtenay Hartford
- Courtenay Hartford
- Courtenay Hartford
- Courtenay Hartford
- Courtenay Hartford
- Courtenay Hartford
- Courtenay Hartford
- Courtenay Hartford
- Courtenay Hartford
- Courtenay Hartford
- Courtenay Hartford
- Courtenay Hartford
- Courtenay Hartford
- Courtenay Hartford
- Courtenay Hartford
- Courtenay Hartford
- Courtenay Hartford
- Courtenay Hartford
- Courtenay Hartford
- Courtenay Hartford
- Courtenay Hartford
- Courtenay Hartford
- Courtenay Hartford
- Courtenay Hartford
- Courtenay Hartford
- Courtenay Hartford
- Courtenay Hartford
- Courtenay Hartford
- Courtenay Hartford
- Courtenay Hartford
- Courtenay Hartford
- Courtenay Hartford
- Courtenay Hartford
- Courtenay Hartford
- Courtenay Hartford
- Courtenay Hartford
- Courtenay Hartford
- Courtenay Hartford
- Courtenay Hartford
- Courtenay Hartford
- Courtenay Hartford
- Courtenay Hartford
- Courtenay Hartford
- Courtenay Hartford
- Courtenay Hartford
- Courtenay Hartford
- Courtenay Hartford
- Courtenay Hartford
- Courtenay Hartford
- Courtenay Hartford
- Courtenay Hartford
- Courtenay Hartford
- Courtenay Hartford
- Courtenay Hartford
- Courtenay Hartford
- Courtenay Hartford
- Courtenay Hartford
- Courtenay Hartford
- Courtenay Hartford
- Courtenay Hartford
- Courtenay Hartford
- Courtenay Hartford
- Courtenay Hartford
- Courtenay Hartford
- Courtenay Hartford
- Courtenay Hartford
- Courtenay Hartford
- Courtenay Hartford
- Courtenay Hartford
- Courtenay Hartford
- Courtenay Hartford
- Courtenay Hartford
- Courtenay Hartford
- Courtenay Hartford
- Courtenay Hartford
- Courtenay Hartford
- Courtenay Hartford
- Courtenay Hartford
- Courtenay Hartford
- Courtenay Hartford
- Courtenay Hartford
- Courtenay Hartford
- Courtenay Hartford
- Courtenay Hartford
- Courtenay Hartford
- Courtenay Hartford
- Courtenay Hartford
- Courtenay Hartford
- Courtenay Hartford
- Courtenay Hartford
- Courtenay Hartford
- Courtenay Hartford
- Courtenay Hartford
- Courtenay Hartford
- Courtenay Hartford
- Courtenay Hartford
- Courtenay Hartford
- Courtenay Hartford
- Courtenay Hartford
- Courtenay Hartford
- Courtenay Hartford
- Courtenay Hartford
- Courtenay Hartford
- Courtenay Hartford
- Courtenay Hartford
- Courtenay Hartford
- Courtenay Hartford
- Courtenay Hartford
- Courtenay Hartford
- Courtenay Hartford
- Courtenay Hartford
- Courtenay Hartford
- Courtenay Hartford
- Courtenay Hartford
- Courtenay Hartford
- Courtenay Hartford
- Courtenay Hartford
- Courtenay Hartford
- Courtenay Hartford
- Courtenay Hartford
- Courtenay Hartford
- Courtenay Hartford
- Courtenay Hartford
- Courtenay Hartford
- Courtenay Hartford
- Courtenay Hartford
- Courtenay Hartford
- Courtenay Hartford
- Courtenay Hartford
- Courtenay Hartford
- Courtenay Hartford
- Courtenay Hartford
- Courtenay Hartford
- Courtenay Hartford
- Courtenay Hartford
- Courtenay Hartford
- Courtenay Hartford
- Courtenay Hartford
- Courtenay Hartford
- Courtenay Hartford
- Courtenay Hartford
- Courtenay Hartford
- Courtenay Hartford
- Courtenay Hartford
- Courtenay Hartford
- Courtenay Hartford
- Courtenay Hartford
- Courtenay Hartford
- Courtenay Hartford
- Courtenay Hartford
- Courtenay Hartford
- Courtenay Hartford
- Courtenay Hartford
- Courtenay Hartford
- Courtenay Hartford
- Courtenay Hartford
- Courtenay Hartford
- Courtenay Hartford
- Courtenay Hartford
- Courtenay Hartford
- Courtenay Hartford
- Courtenay Hartford
- Courtenay Hartford
- Courtenay Hartford
- Courtenay Hartford
- Courtenay Hartford
- Courtenay Hartford
- Courtenay Hartford
- Courtenay Hartford
- Courtenay Hartford
- Courtenay Hartford
- Courtenay Hartford
- Courtenay Hartford
- Courtenay Hartford
- Courtenay Hartford
- Courtenay Hartford
- Courtenay Hartford
- Courtenay Hartford
- Courtenay Hartford
- Courtenay Hartford
- Courtenay Hartford
- Courtenay Hartford
- Courtenay Hartford
- Courtenay Hartford
- Courtenay Hartford
- Courtenay Hartford
- Courtenay Hartford
- Courtenay Hartford
- Courtenay Hartford
- Courtenay Hartford
- Courtenay Hartford
- Courtenay Hartford
- Courtenay Hartford
- Courtenay Hartford
- Courtenay Hartford
- Courtenay Hartford
- Courtenay Hartford
- Courtenay Hartford
- Courtenay Hartford
- Courtenay Hartford
- Courtenay Hartford
- Courtenay Hartford
- Courtenay Hartford
- Courtenay Hartford
- Courtenay Hartford
- Courtenay Hartford
- Courtenay Hartford
- Courtenay Hartford
- Courtenay Hartford
- Courtenay Hartford
- Courtenay Hartford
- Courtenay Hartford
- Courtenay Hartford
- Courtenay Hartford
- Courtenay Hartford
- Courtenay Hartford
- Courtenay Hartford
- Courtenay Hartford
- Courtenay Hartford
- Courtenay Hartford
- Courtenay Hartford
- Courtenay Hartford
- Courtenay Hartford
- Courtenay Hartford
- Courtenay Hartford
- Courtenay Hartford
- Courtenay Hartford
- Courtenay Hartford
- Courtenay Hartford
- Courtenay Hartford
- Courtenay Hartford
- Courtenay Hartford
- Courtenay Hartford
- Courtenay Hartford
- Courtenay Hartford
- Courtenay Hartford
- Courtenay Hartford
- Courtenay Hartford
- Courtenay Hartford
- Courtenay Hartford
- Courtenay Hartford
- Courtenay Hartford
- Courtenay Hartford
- Courtenay Hartford
- Courtenay Hartford
- Courtenay Hartford
- Courtenay Hartford
- Courtenay Hartford
- Courtenay Hartford
- Courtenay Hartford
- Courtenay Hartford
- Courtenay Hartford
- Courtenay Hartford
- Courtenay Hartford
- Courtenay Hartford
- Courtenay Hartford
- Courtenay Hartford
- Courtenay Hartford
- Courtenay Hartford
- Courtenay Hartford
- Courtenay Hartford
- Courtenay Hartford
- Courtenay Hartford
- Courtenay Hartford
- Courtenay Hartford
- Courtenay Hartford
- Courtenay Hartford
- Courtenay Hartford
- Courtenay Hartford
- Courtenay Hartford
- Courtenay Hartford
- Courtenay Hartford
- Courtenay Hartford
- Courtenay Hartford
- Courtenay Hartford
- Courtenay Hartford
- Courtenay Hartford
- Courtenay Hartford
- Courtenay Hartford
- Courtenay Hartford
- Courtenay Hartford
- Courtenay Hartford
- Courtenay Hartford
- Courtenay Hartford
- Courtenay Hartford
- Courtenay Hartford
- Courtenay Hartford
- Courtenay Hartford
- Courtenay Hartford
- Courtenay Hartford
- Courtenay Hartford
- Courtenay Hartford
- Courtenay Hartford
- Courtenay Hartford
- Courtenay Hartford
- Courtenay Hartford
- Courtenay Hartford
- Courtenay Hartford
- Courtenay Hartford
- Courtenay Hartford
- Courtenay Hartford
- Courtenay Hartford
- Courtenay Hartford
- Courtenay Hartford
- Courtenay Hartford
- Courtenay Hartford
- Courtenay Hartford
- Courtenay Hartford
- Courtenay Hartford
- Courtenay Hartford
- Courtenay Hartford
- Courtenay Hartford
- Courtenay Hartford
- Courtenay Hartford
- Courtenay Hartford
- Courtenay Hartford
- Courtenay Hartford
- Courtenay Hartford
- Courtenay Hartford
- Courtenay Hartford
- Courtenay Hartford
- Courtenay Hartford
- Courtenay Hartford
- Courtenay Hartford
- Courtenay Hartford
- Courtenay Hartford
- Courtenay Hartford
- Courtenay Hartford
- Courtenay Hartford
- Courtenay Hartford
- Courtenay Hartford
- Courtenay Hartford
- Courtenay Hartford
- Courtenay Hartford
- Courtenay Hartford
- Courtenay Hartford
- Courtenay Hartford
- Courtenay Hartford
- Courtenay Hartford
- Courtenay Hartford
- Courtenay Hartford
- Courtenay Hartford
- Courtenay Hartford
- Courtenay Hartford
- Courtenay Hartford
- Courtenay Hartford
- Courtenay Hartford
- Courtenay Hartford
- Courtenay Hartford
- Courtenay Hartford
- Courtenay Hartford
- Courtenay Hartford
- Courtenay Hartford
- Courtenay Hartford
- Courtenay Hartford
- Courtenay Hartford
- Courtenay Hartford
- Courtenay Hartford
- Courtenay Hartford
- Courtenay Hartford
- Courtenay Hartford
- Courtenay Hartford
- Courtenay Hartford
- Courtenay Hartford
- Courtenay Hartford
- Courtenay Hartford
- Courtenay Hartford
- Courtenay Hartford
- Courtenay Hartford
- Courtenay Hartford
- Courtenay Hartford
- Courtenay Hartford
- Courtenay Hartford
- Courtenay Hartford
- Courtenay Hartford
- Courtenay Hartford
- Courtenay Hartford
- Courtenay Hartford
- Courtenay Hartford
- Courtenay Hartford
- Courtenay Hartford
- Courtenay Hartford
- Courtenay Hartford
- Courtenay Hartford
- Courtenay Hartford
- Courtenay Hartford
- Courtenay Hartford
- Courtenay Hartford
- Courtenay Hartford
- Courtenay Hartford
- Courtenay Hartford
- Courtenay Hartford
- Courtenay Hartford
- Courtenay Hartford
- Courtenay Hartford
- Courtenay Hartford
- Courtenay Hartford
- Courtenay Hartford
- Courtenay Hartford
- Courtenay Hartford
- Courtenay Hartford
- Courtenay Hartford
- Courtenay Hartford
- Courtenay Hartford
- Courtenay Hartford
- Courtenay Hartford
- Courtenay Hartford
- Courtenay Hartford
- Courtenay Hartford
- Courtenay Hartford
- Courtenay Hartford
- Courtenay Hartford
- Courtenay Hartford
- Courtenay Hartford
- Courtenay Hartford
- Courtenay Hartford
- Courtenay Hartford
- Courtenay Hartford
- Courtenay Hartford
- Courtenay Hartford
- Courtenay Hartford
- Courtenay Hartford
- Courtenay Hartford
- Courtenay Hartford
- Courtenay Hartford
- Courtenay Hartford
- Courtenay Hartford
- Courtenay Hartford
- Courtenay Hartford
- Courtenay Hartford
- Courtenay Hartford
- Courtenay Hartford
- Courtenay Hartford
- Courtenay Hartford
- Courtenay Hartford
- Courtenay Hartford
- Courtenay Hartford
- Courtenay Hartford
- Courtenay Hartford
- Courtenay Hartford
- Courtenay Hartford
- Courtenay Hartford
- Courtenay Hartford
- Courtenay Hartford
- Courtenay Hartford
- Courtenay Hartford
- Courtenay Hartford
- Courtenay Hartford
- Courtenay Hartford
- Courtenay Hartford
- Courtenay Hartford
- Courtenay Hartford
- Courtenay Hartford
- Courtenay Hartford
- Courtenay Hartford
- Courtenay Hartford
- Courtenay Hartford
- Courtenay Hartford
- Courtenay Hartford
- Courtenay Hartford
- Courtenay Hartford
- Courtenay Hartford
- Courtenay Hartford
- Courtenay Hartford
- Courtenay Hartford
- Courtenay Hartford
- Courtenay Hartford
- Courtenay Hartford
- Courtenay Hartford
- Courtenay Hartford
- Courtenay Hartford
- Courtenay Hartford
- Courtenay Hartford
- Courtenay Hartford
- Courtenay Hartford
- Courtenay Hartford
- Courtenay Hartford
- Courtenay Hartford
- Courtenay Hartford
- Courtenay Hartford
- Courtenay Hartford
- Courtenay Hartford
- Courtenay Hartford
- Courtenay Hartford
- Courtenay Hartford
- Courtenay Hartford
- Courtenay Hartford
- Courtenay Hartford
- Courtenay Hartford
- Courtenay Hartford
- Courtenay Hartford
- Courtenay Hartford
- Courtenay Hartford
- Courtenay Hartford
- Courtenay Hartford
- Courtenay Hartford
- Courtenay Hartford
- Courtenay Hartford
- Courtenay Hartford
- Courtenay Hartford
- Courtenay Hartford
- Courtenay Hartford
- Courtenay Hartford
- Courtenay Hartford
- Courtenay Hartford
- Courtenay Hartford
- Courtenay Hartford
- Courtenay Hartford
- Courtenay Hartford
- Courtenay Hartford
- Courtenay Hartford
- Courtenay Hartford
- Courtenay Hartford
- Courtenay Hartford
- Courtenay Hartford
- Courtenay Hartford
- Courtenay Hartford
- Courtenay Hartford
- Courtenay Hartford
- Courtenay Hartford
- Courtenay Hartford
- Courtenay Hartford
- Courtenay Hartford
- Courtenay Hartford
- Courtenay Hartford
- Courtenay Hartford
- Courtenay Hartford
- Courtenay Hartford
- Courtenay Hartford
- Courtenay Hartford
- Courtenay Hartford
- Courtenay Hartford
- Courtenay Hartford
- Courtenay Hartford
- Courtenay Hartford
- Courtenay Hartford
- Courtenay Hartford
- Courtenay Hartford
- Courtenay Hartford
- Courtenay Hartford
- Courtenay Hartford
- Courtenay Hartford
- Courtenay Hartford
- Courtenay Hartford
- Courtenay Hartford
- Courtenay Hartford
- Courtenay Hartford
- Courtenay Hartford
- Courtenay Hartford
- Courtenay Hartford
- Courtenay Hartford
- Courtenay Hartford
- Courtenay Hartford
- Courtenay Hartford
- Courtenay Hartford
- Courtenay Hartford
- Courtenay Hartford
- Courtenay Hartford
- Courtenay Hartford
- Courtenay Hartford
- Courtenay Hartford
- Courtenay Hartford
- Courtenay Hartford
- Courtenay Hartford
- Courtenay Hartford
- Courtenay Hartford
- Courtenay Hartford
- Courtenay Hartford
- Courtenay Hartford
- Courtenay Hartford
- Courtenay Hartford
- Courtenay Hartford
- Courtenay Hartford
- Courtenay Hartford
- Courtenay Hartford
- Courtenay Hartford
- Courtenay Hartford
- Courtenay Hartford
- Courtenay Hartford
- Courtenay Hartford
- Courtenay Hartford
- Courtenay Hartford
- Courtenay Hartford
- Courtenay Hartford
- Courtenay Hartford
- Courtenay Hartford
- Courtenay Hartford
- Courtenay Hartford
- Courtenay Hartford
- Courtenay Hartford
- Courtenay Hartford
- Courtenay Hartford
- Courtenay Hartford
- Courtenay Hartford
- Courtenay Hartford
- Courtenay Hartford
- Courtenay Hartford
- Courtenay Hartford
- Courtenay Hartford
- Courtenay Hartford
- Courtenay Hartford
- Courtenay Hartford
- Courtenay Hartford
- Courtenay Hartford
- Courtenay Hartford
- Courtenay Hartford
- Courtenay Hartford
- Courtenay Hartford
- Courtenay Hartford
- Courtenay Hartford
- Courtenay Hartford
- Courtenay Hartford
- Courtenay Hartford
- Courtenay Hartford
- Courtenay Hartford
- Courtenay Hartford
- Courtenay Hartford
- Courtenay Hartford
- Courtenay Hartford
- Courtenay Hartford
- Courtenay Hartford
- Courtenay Hartford
- Courtenay Hartford
- Courtenay Hartford
- Courtenay Hartford
- Courtenay Hartford
- Courtenay Hartford
- Courtenay Hartford
- Courtenay Hartford
- Courtenay Hartford
- Courtenay Hartford
- Courtenay Hartford
- Courtenay Hartford
- Courtenay Hartford
- Courtenay Hartford
- Courtenay Hartford
- Courtenay Hartford
- Courtenay Hartford
- Courtenay Hartford
- Courtenay Hartford
- Courtenay Hartford
- Courtenay Hartford
- Courtenay Hartford
- Courtenay Hartford
- Courtenay Hartford
- Courtenay Hartford
- Courtenay Hartford
- Courtenay Hartford
- Courtenay Hartford
- Courtenay Hartford
- Courtenay Hartford
- Courtenay Hartford
- Courtenay Hartford
- Courtenay Hartford
- Courtenay Hartford
- Courtenay Hartford
- Courtenay Hartford
- Courtenay Hartford
- Courtenay Hartford
- Courtenay Hartford
- Courtenay Hartford
- Courtenay Hartford
- Courtenay Hartford
- Courtenay Hartford
- Courtenay Hartford
- Courtenay Hartford
- Courtenay Hartford
- Courtenay Hartford
- Courtenay Hartford
- Courtenay Hartford
- Courtenay Hartford
- Courtenay Hartford
- Courtenay Hartford
- Courtenay Hartford
- Courtenay Hartford
- Courtenay Hartford
- Courtenay Hartford
- Courtenay Hartford
- Courtenay Hartford
- Courtenay Hartford
- Courtenay Hartford
- Courtenay Hartford
- Courtenay Hartford
- Courtenay Hartford
- Courtenay Hartford
- Courtenay Hartford
- Courtenay Hartford
- Courtenay Hartford
- Courtenay Hartford
- Courtenay Hartford
- Courtenay Hartford
- Courtenay Hartford
- Courtenay Hartford
- Courtenay Hartford
- Courtenay Hartford
- Courtenay Hartford
- Courtenay Hartford
- Courtenay Hartford
- Courtenay Hartford
- Courtenay Hartford
- Courtenay Hartford
- Courtenay Hartford
- Courtenay Hartford
- Courtenay Hartford
- Courtenay Hartford
- Courtenay Hartford
- Courtenay Hartford
- Courtenay Hartford
- Courtenay Hartford
- Courtenay Hartford
- Courtenay Hartford
- Courtenay Hartford
- Courtenay Hartford
- Courtenay Hartford
- Courtenay Hartford
- Courtenay Hartford
- Courtenay Hartford
- Courtenay Hartford
- Courtenay Hartford
- Courtenay Hartford
- Courtenay Hartford
- Courtenay Hartford
- Courtenay Hartford
- Courtenay Hartford
- Courtenay Hartford
- Courtenay Hartford
- Courtenay Hartford
- Courtenay Hartford
- Courtenay Hartford
- Courtenay Hartford
- Courtenay Hartford
- Courtenay Hartford
- Courtenay Hartford
- Courtenay Hartford
- Courtenay Hartford
- Courtenay Hartford
- Courtenay Hartford
- Courtenay Hartford
- Courtenay Hartford
- Courtenay Hartford
- Courtenay Hartford
- Courtenay Hartford
- Courtenay Hartford
- Courtenay Hartford
- Courtenay Hartford
- Courtenay Hartford
- Courtenay Hartford
- Courtenay Hartford
- Courtenay Hartford
- Courtenay Hartford
- Courtenay Hartford
- Courtenay Hartford
- Courtenay Hartford
- Courtenay Hartford
- Courtenay Hartford
- Courtenay Hartford
- Courtenay Hartford
- Courtenay Hartford
- Courtenay Hartford
- Courtenay Hartford
- Courtenay Hartford
- Courtenay Hartford
- Courtenay Hartford
- Courtenay Hartford
- Courtenay Hartford
- Courtenay Hartford
- Courtenay Hartford
- Courtenay Hartford
- Courtenay Hartford
- Courtenay Hartford
- Courtenay Hartford
- Courtenay Hartford
- Courtenay Hartford
- Courtenay Hartford
- Courtenay Hartford
- Courtenay Hartford
- Courtenay Hartford
- Courtenay Hartford
- Courtenay Hartford
- Courtenay Hartford
- Courtenay Hartford
- Courtenay Hartford
- Courtenay Hartford
- Courtenay Hartford
- Courtenay Hartford
- Courtenay Hartford
- Courtenay Hartford
- Courtenay Hartford
- Courtenay Hartford
- Courtenay Hartford
- Courtenay Hartford
- Courtenay Hartford
- Courtenay Hartford
- Courtenay Hartford
- Courtenay Hartford
- Courtenay Hartford
- Courtenay Hartford
- Courtenay Hartford
- Courtenay Hartford
- Courtenay Hartford
- Courtenay Hartford
- Courtenay Hartford
- Courtenay Hartford
- Courtenay Hartford
- Courtenay Hartford
- Courtenay Hartford
- Courtenay Hartford
- Courtenay Hartford
- Courtenay Hartford
- Courtenay Hartford
- Courtenay Hartford
- Courtenay Hartford
- Courtenay Hartford
- Courtenay Hartford
- Courtenay Hartford
- Courtenay Hartford
- Courtenay Hartford
- Courtenay Hartford
- Courtenay Hartford
- Courtenay Hartford
- Courtenay Hartford
- Courtenay Hartford
- Courtenay Hartford
- Courtenay Hartford
- Courtenay Hartford
- Courtenay Hartford
- Courtenay Hartford
- Courtenay Hartford
- Courtenay Hartford
- Courtenay Hartford
- Courtenay Hartford
- Courtenay Hartford
- Courtenay Hartford
- Courtenay Hartford
- Courtenay Hartford
- Courtenay Hartford
- Courtenay Hartford
- Courtenay Hartford
- Courtenay Hartford
- Courtenay Hartford
- Courtenay Hartford
- Courtenay Hartford
- Courtenay Hartford
- Courtenay Hartford
- Courtenay Hartford
- Courtenay Hartford
- Courtenay Hartford
- Courtenay Hartford
- Courtenay Hartford
- Courtenay Hartford
- Courtenay Hartford
- Courtenay Hartford
- Courtenay Hartford
- Courtenay Hartford
- Courtenay Hartford
- Courtenay Hartford
- Courtenay Hartford
- Courtenay Hartford
- Courtenay Hartford
- Courtenay Hartford
- Courtenay Hartford
- Courtenay Hartford
- Courtenay Hartford
- Courtenay Hartford
- Courtenay Hartford
- Courtenay Hartford
- Courtenay Hartford
- Courtenay Hartford
- Courtenay Hartford
- Courtenay Hartford
- Courtenay Hartford
- Courtenay Hartford
- Courtenay Hartford
- Courtenay Hartford
- Courtenay Hartford
- Courtenay Hartford
- Courtenay Hartford
- Courtenay Hartford
- Courtenay Hartford
- Courtenay Hartford
- Courtenay Hartford
- Courtenay Hartford
- Courtenay Hartford
- Courtenay Hartford
- Courtenay Hartford
- Courtenay Hartford
- Courtenay Hartford
- Courtenay Hartford
- Courtenay Hartford
- Courtenay Hartford
- Courtenay Hartford
- Courtenay Hartford
- Courtenay Hartford
- Courtenay Hartford
- Courtenay Hartford
- Courtenay Hartford
- Courtenay Hartford
- Courtenay Hartford
- Courtenay Hartford
- Courtenay Hartford
- Courtenay Hartford
- Courtenay Hartford
- Courtenay Hartford
- Courtenay Hartford
- Courtenay Hartford
- Courtenay Hartford
- Courtenay Hartford
- Courtenay Hartford
- Courtenay Hartford
- Courtenay Hartford
- Courtenay Hartford
- Courtenay Hartford
- Courtenay Hartford
- Courtenay Hartford
- Courtenay Hartford
- Courtenay Hartford
- Courtenay Hartford
- Courtenay Hartford
- Courtenay Hartford
- Courtenay Hartford
- Courtenay Hartford
- Courtenay Hartford
- Courtenay Hartford
- Courtenay Hartford
- Courtenay Hartford
- Courtenay Hartford
- Courtenay Hartford
- Courtenay Hartford
- Courtenay Hartford
- Courtenay Hartford
- Courtenay Hartford
- Courtenay Hartford
- Courtenay Hartford
- Courtenay Hartford
- Courtenay Hartford
- Courtenay Hartford
- Courtenay Hartford
- Courtenay Hartford
- Courtenay Hartford
- Courtenay Hartford
- Courtenay Hartford
- Courtenay Hartford
- Courtenay Hartford
- Courtenay Hartford
- Courtenay Hartford
- Courtenay Hartford
- Courtenay Hartford
- Courtenay Hartford
- Courtenay Hartford
- Courtenay Hartford
- Courtenay Hartford
- Courtenay Hartford
- Courtenay Hartford
- Courtenay Hartford
- Courtenay Hartford
- Courtenay Hartford
- Courtenay Hartford
- Courtenay Hartford
- Courtenay Hartford
- Courtenay Hartford
- Courtenay Hartford
- Courtenay Hartford
- Courtenay Hartford
- Courtenay Hartford
- Courtenay Hartford
- Courtenay Hartford
- Courtenay Hartford
- Courtenay Hartford
- Courtenay Hartford
- Courtenay Hartford
- Courtenay Hartford
- Courtenay Hartford
- Courtenay Hartford
- Courtenay Hartford
- Courtenay Hartford
- Courtenay Hartford
- Courtenay Hartford
- Courtenay Hartford
- Courtenay Hartford
- Courtenay Hartford
- Courtenay Hartford
- Courtenay Hartford
- Courtenay Hartford
- Courtenay Hartford
- Courtenay Hartford
- Courtenay Hartford
- Courtenay Hartford
- Courtenay Hartford
- Courtenay Hartford
- Courtenay Hartford
- Courtenay Hartford
- Courtenay Hartford
- Courtenay Hartford
- Courtenay Hartford
- Courtenay Hartford
- Courtenay Hartford
- Courtenay Hartford
- Courtenay Hartford
- Courtenay Hartford
- Courtenay Hartford
- Courtenay Hartford
- Courtenay Hartford
- Courtenay Hartford
- Courtenay Hartford
- Courtenay Hartford
- Courtenay Hartford
- Courtenay Hartford
- Courtenay Hartford
- Courtenay Hartford
- Courtenay Hartford
- Courtenay Hartford
- Courtenay Hartford
- Courtenay Hartford
- Courtenay Hartford
- Courtenay Hartford
- Courtenay Hartford
- Courtenay Hartford
- Courtenay Hartford
- Courtenay Hartford
- Courtenay Hartford
- Courtenay Hartford
- Courtenay Hartford
- Courtenay Hartford
- Courtenay Hartford
- Courtenay Hartford
- Courtenay Hartford
- Courtenay Hartford
- Courtenay Hartford
- Courtenay Hartford
- Courtenay Hartford
- Courtenay Hartford
- Courtenay Hartford
- Courtenay Hartford
- Courtenay Hartford
- Courtenay Hartford
- Courtenay Hartford
- Courtenay Hartford
- Courtenay Hartford
- Courtenay Hartford
- Courtenay Hartford
- Courtenay Hartford
- Courtenay Hartford
- Courtenay Hartford
- Courtenay Hartford
- Courtenay Hartford
- Courtenay Hartford
- Courtenay Hartford
- Courtenay Hartford
- Courtenay Hartford
- Courtenay Hartford
- Courtenay Hartford
- Courtenay Hartford
- Courtenay Hartford
- Courtenay Hartford
- Courtenay Hartford
- Courtenay Hartford
- Courtenay Hartford
- Courtenay Hartford
- Courtenay Hartford
- Courtenay Hartford
- Courtenay Hartford
- Courtenay Hartford
- Courtenay Hartford
- Courtenay Hartford
- Courtenay Hartford
- Courtenay Hartford
- Courtenay Hartford
- Courtenay Hartford
- Courtenay Hartford
- Courtenay Hartford
- Courtenay Hartford
- Courtenay Hartford
- Courtenay Hartford
- Courtenay Hartford
- Courtenay Hartford
- Courtenay Hartford
- Courtenay Hartford
- Courtenay Hartford
- Courtenay Hartford
- Courtenay Hartford
- Courtenay Hartford
- Courtenay Hartford
- Courtenay Hartford
- Courtenay Hartford
- Courtenay Hartford
- Courtenay Hartford
- Courtenay Hartford
- Courtenay Hartford
- Courtenay Hartford
- Courtenay Hartford
- Courtenay Hartford
- Courtenay Hartford
- Courtenay Hartford
- Courtenay Hartford
- Courtenay Hartford
- Courtenay Hartford
- Courtenay Hartford
- Courtenay Hartford
- Courtenay Hartford
- Courtenay Hartford
- Courtenay Hartford
- Courtenay Hartford
- Courtenay Hartford
- Courtenay Hartford
- Courtenay Hartford
- Courtenay Hartford
- Courtenay Hartford
- Courtenay Hartford
- Courtenay Hartford
- Courtenay Hartford
- Courtenay Hartford
- Courtenay Hartford
- Courtenay Hartford
- Courtenay Hartford
- Courtenay Hartford
- Courtenay Hartford
- Courtenay Hartford
- Courtenay Hartford
- Courtenay Hartford
- Courtenay Hartford
- Courtenay Hartford
- Courtenay Hartford
- Courtenay Hartford
- Courtenay Hartford
- Courtenay Hartford
- Courtenay Hartford
- Courtenay Hartford
- Courtenay Hartford
- Courtenay Hartford
- Courtenay Hartford
- Courtenay Hartford
- Courtenay Hartford
- Courtenay Hartford
- Courtenay Hartford
- Courtenay Hartford
- Courtenay Hartford
- Courtenay Hartford
- Courtenay Hartford
- Courtenay Hartford
- Courtenay Hartford
- Courtenay Hartford
- Courtenay Hartford
- Courtenay Hartford
- Courtenay Hartford
- Courtenay Hartford
- Courtenay Hartford
- Courtenay Hartford
- Courtenay Hartford
- Courtenay Hartford
- Courtenay Hartford
- Courtenay Hartford
- Courtenay Hartford
- Courtenay Hartford
- Courtenay Hartford
- Courtenay Hartford
- Courtenay Hartford
- Courtenay Hartford
- Courtenay Hartford
- Courtenay Hartford
- Courtenay Hartford
- Courtenay Hartford
- Courtenay Hartford
- Courtenay Hartford
- Courtenay Hartford
- Courtenay Hartford
- Courtenay Hartford
- Courtenay Hartford
- Courtenay Hartford
- Courtenay Hartford
- Courtenay Hartford
- Courtenay Hartford
- Courtenay Hartford
- Courtenay Hartford
- Courtenay Hartford
- Courtenay Hartford
- Courtenay Hartford
- Courtenay Hartford
- Courtenay Hartford
- Courtenay Hartford
- Courtenay Hartford
- Courtenay Hartford
- Courtenay Hartford
- Courtenay Hartford
- Courtenay Hartford
- Courtenay Hartford
- Courtenay Hartford
- Courtenay Hartford
- Courtenay Hartford
- Courtenay Hartford
- Courtenay Hartford
- Courtenay Hartford
- Courtenay Hartford
- Courtenay Hartford
- Courtenay Hartford
- Courtenay Hartford
- Courtenay Hartford
- Courtenay Hartford
- Courtenay Hartford
- Courtenay Hartford
- Courtenay Hartford
- Courtenay Hartford
- Courtenay Hartford
- Courtenay Hartford
- Courtenay Hartford
- Courtenay Hartford
- Courtenay Hartford
- Courtenay Hartford
- Courtenay Hartford
- Courtenay Hartford
- Courtenay Hartford
- Courtenay Hartford
- Courtenay Hartford
- Courtenay Hartford
- Courtenay Hartford
- Courtenay Hartford
- Courtenay Hartford
- Courtenay Hartford
- Courtenay Hartford
- Courtenay Hartford
- Courtenay Hartford
- Courtenay Hartford
- Courtenay Hartford
- Courtenay Hartford
- Courtenay Hartford
- Courtenay Hartford
- Courtenay Hartford
- Courtenay Hartford
- Courtenay Hartford
- Courtenay Hartford
- Courtenay Hartford
- Courtenay Hartford
- Courtenay Hartford
- Courtenay Hartford
- Courtenay Hartford
- Courtenay Hartford
- Courtenay Hartford
- Courtenay Hartford
- Courtenay Hartford
- Courtenay Hartford
- Courtenay Hartford
- Courtenay Hartford
- Courtenay Hartford
- Courtenay Hartford
- Courtenay Hartford
- Courtenay Hartford
- Courtenay Hartford
- Courtenay Hartford
- Courtenay Hartford
- Courtenay Hartford
- Courtenay Hartford
- Courtenay Hartford
- Courtenay Hartford
- Courtenay Hartford
- Courtenay Hartford
- Courtenay Hartford
- Courtenay Hartford
- Courtenay Hartford
- Courtenay Hartford
- Courtenay Hartford
- Courtenay Hartford
- Courtenay Hartford
- Courtenay Hartford
- Courtenay Hartford
- Courtenay Hartford
- Courtenay Hartford
- Courtenay Hartford
- Courtenay Hartford
- Courtenay Hartford
- Courtenay Hartford
- Courtenay Hartford
- Courtenay Hartford
- Courtenay Hartford
- Courtenay Hartford
- Courtenay Hartford
- Courtenay Hartford
- Courtenay Hartford
- Courtenay Hartford
- Courtenay Hartford
- Courtenay Hartford
- Courtenay Hartford
- Courtenay Hartford
- Courtenay Hartford
- Courtenay Hartford
- Courtenay Hartford
- Courtenay Hartford
- Courtenay Hartford
- Courtenay Hartford
- Courtenay Hartford
- Courtenay Hartford
- Courtenay Hartford
- Courtenay Hartford
- Courtenay Hartford
- Courtenay Hartford
- Courtenay Hartford
- Courtenay Hartford
- Courtenay Hartford
- Courtenay Hartford
- Courtenay Hartford
- Courtenay Hartford
- Courtenay Hartford
- Courtenay Hartford
- Courtenay Hartford
- Courtenay Hartford
- Courtenay Hartford
- Courtenay Hartford
- Courtenay Hartford
- Courtenay Hartford
- Courtenay Hartford
- Courtenay Hartford
- Courtenay Hartford
- Courtenay Hartford
- Courtenay Hartford
- Courtenay Hartford
- Courtenay Hartford
- Courtenay Hartford
- Courtenay Hartford
- Courtenay Hartford
- Courtenay Hartford
- Courtenay Hartford
- Courtenay Hartford
- Courtenay Hartford
- Courtenay Hartford
- Courtenay Hartford
- Courtenay Hartford
- Courtenay Hartford
- Courtenay Hartford
- Courtenay Hartford
- Courtenay Hartford
- Courtenay Hartford
- Courtenay Hartford
- Courtenay Hartford
- Courtenay Hartford
- Courtenay Hartford
- Courtenay Hartford
- Courtenay Hartford
- Courtenay Hartford
- Courtenay Hartford
- Courtenay Hartford
- Courtenay Hartford
- Courtenay Hartford
- Courtenay Hartford
- Courtenay Hartford
- Courtenay Hartford
- Courtenay Hartford
- Courtenay Hartford
- Courtenay Hartford
- Courtenay Hartford
- Courtenay Hartford
- Courtenay Hartford
- Courtenay Hartford
- Courtenay Hartford
- Courtenay Hartford
- Courtenay Hartford
- Courtenay Hartford
- Courtenay Hartford
- Courtenay Hartford
- Courtenay Hartford
- Courtenay Hartford
- Courtenay Hartford
- Courtenay Hartford
- Courtenay Hartford
- Courtenay Hartford
- Courtenay Hartford
- Courtenay Hartford
- Courtenay Hartford
- Courtenay Hartford
- Courtenay Hartford
- Courtenay Hartford
- Courtenay Hartford
- Courtenay Hartford
- Courtenay Hartford
- Courtenay Hartford
- Courtenay Hartford
- Courtenay Hartford
- Courtenay Hartford
- Courtenay Hartford
- Courtenay Hartford
- Courtenay Hartford
- Courtenay Hartford
- Courtenay Hartford
- Courtenay Hartford
- Courtenay Hartford
- Courtenay Hartford
- Courtenay Hartford
- Courtenay Hartford
- Courtenay Hartford
- Courtenay Hartford
- Courtenay Hartford
- Courtenay Hartford
- Courtenay Hartford
- Courtenay Hartford
- Courtenay Hartford
- Courtenay Hartford
- Courtenay Hartford
- Courtenay Hartford
- Courtenay Hartford
- Courtenay Hartford
- Courtenay Hartford
- Courtenay Hartford
- Courtenay Hartford
- Courtenay Hartford
- Courtenay Hartford
- Courtenay Hartford
- Courtenay Hartford
- Courtenay Hartford
- Courtenay Hartford
- Courtenay Hartford
- Courtenay Hartford
- Courtenay Hartford
- Courtenay Hartford
- Courtenay Hartford
- Courtenay Hartford
- Courtenay Hartford
- Courtenay Hartford
- Courtenay Hartford
- Courtenay Hartford
- Courtenay Hartford
- Courtenay Hartford
- Courtenay Hartford
- Courtenay Hartford
- Courtenay Hartford
- Courtenay Hartford
- Courtenay Hartford
- Courtenay Hartford
- Courtenay Hartford
- Courtenay Hartford
- Courtenay Hartford
- Courtenay Hartford
- Courtenay Hartford
- Courtenay Hartford
- Courtenay Hartford
- Courtenay Hartford
- Courtenay Hartford
- Courtenay Hartford
- Courtenay Hartford
- Courtenay Hartford
- Courtenay Hartford
- Courtenay Hartford
- Courtenay Hartford
- Courtenay Hartford
- Courtenay Hartford
- Courtenay Hartford
- Courtenay Hartford
- Courtenay Hartford
- Courtenay Hartford
- Courtenay Hartford
- Courtenay Hartford
- Courtenay Hartford
- Courtenay Hartford