I’m not even exaggerating when I say we’ve been working on this project for like 2 years. Actually it’s been almost exactly 2 years and one month.
Funny story about that: When we first got the idea to put in this wall of cabinets in the back hall off of our master bedroom, little Jack was about 3 weeks old. Chris saw that they had a whole bunch of basic cabinetry in stock at our local Home Depot that he could just grab and toss in the back of his truck for about $100 per cabinet and I thought it was a great idea!
But.
We’d just finished working on Jack’s nursery for the last year or so and I didn’t want to start on any big projects. So I said we could do it, but we really should just put the cabinets up, power through it, and be done in like 2 weeks. Famous last words, of course.
Chris actually got the old shelving ripped out and the new cabinets up in about 24 hours, which was an awesome start to the project. But then it was all the little details like adding in the little wood countertop, trimming things out, and painting all the cabinets that feel like they took forever, as usual. You’d think I would have learned by now!
Oh well! I absolutely love it now and I’ve been spending the last little while getting things all organized and super-functional in there and now I’m so glad we took this project on even thought it took just a leeeeeetle longer than I thought it would. 🙂
So here’s how the room looked before we started this project.
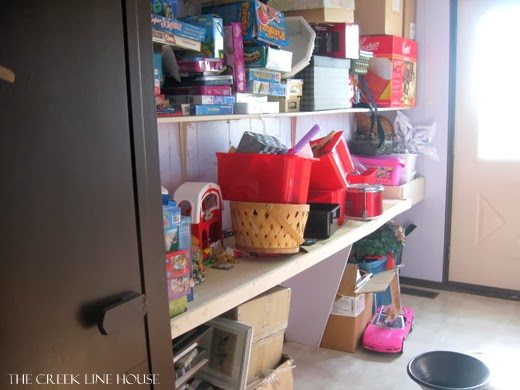
Ummm, yeah. That was real. That was my bedroom.
Our master bedroom was built an as addition so it’s in its own wing off to one side of our house. It has a hallway off the back that leads out to a deck, with our ensuite bathroom right off the hall.
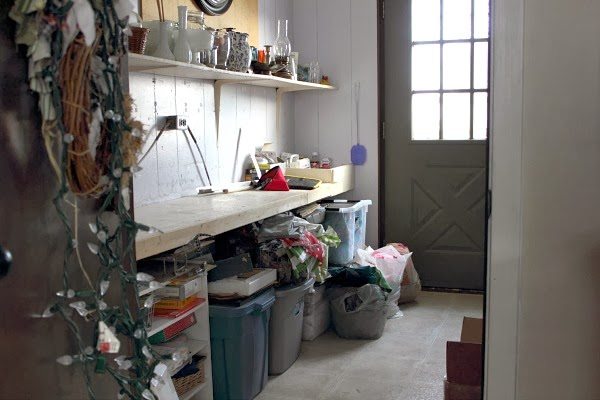
This was another incarnation of the room and another attempt to somehow temporarily organize all the stuff that was back there.
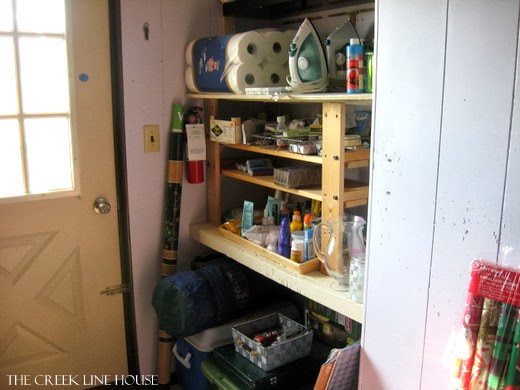
This little shelf nook is actually where the door to the bathroom is now. We moved it during our recent bathroom renovation so now it’s easy to access right off the back door instead of people needing to go all the way into our bedroom to get to it.
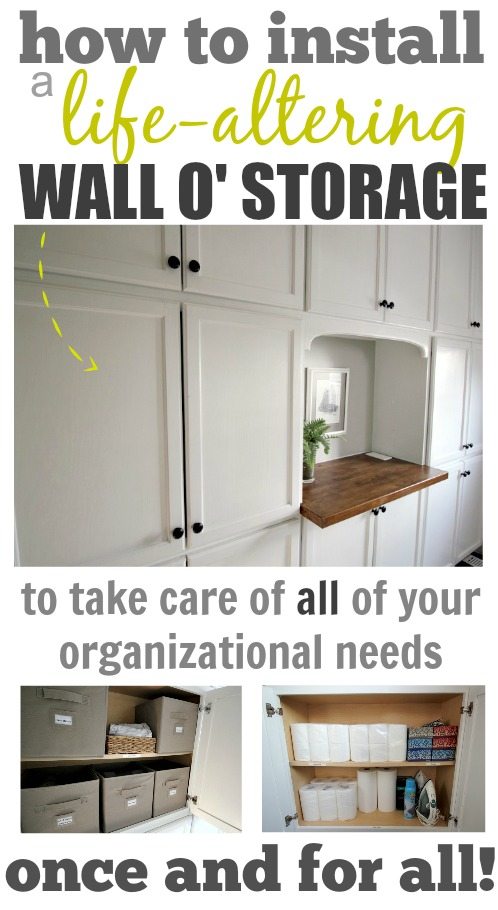
So here’s how the hallway looks now!
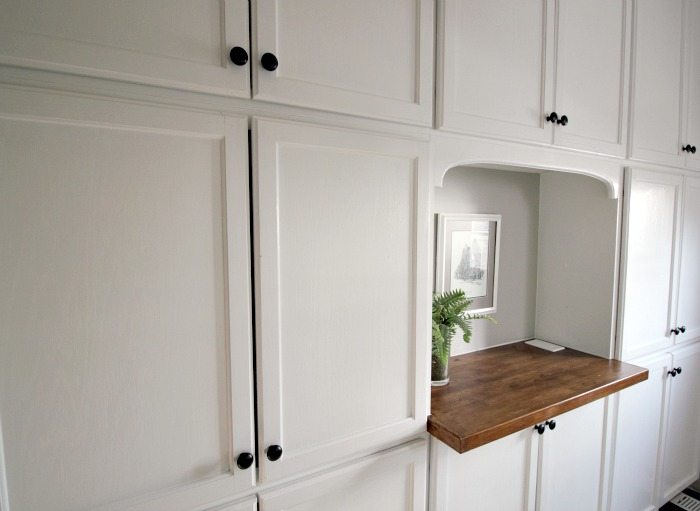
Pretty great, right?
Well, OK for the sake of reality, let’s bring the frame back a bit and you can see what it really looks like in this hallway.
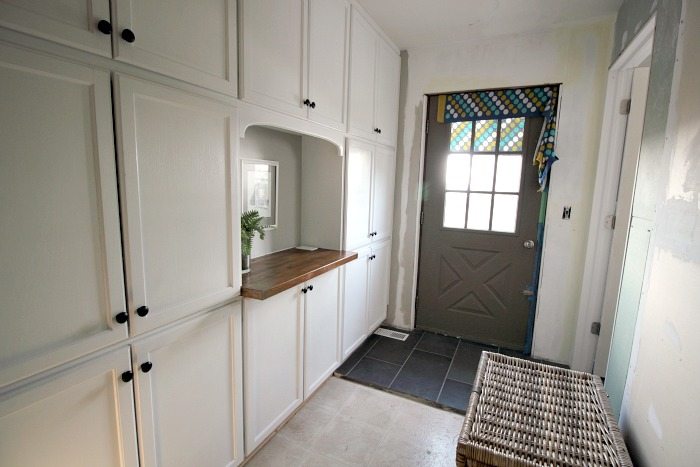
The drywall on the opposite wall still needs to be finished and painted, we brought the bathroom flooring out to the entryway to the deck, but now there’s a big lip because we still need to (one day) put the new flooring in the bedroom, and the wind was coming in at a weird angle one night and whistling in the cracks in this door because we haven’t quite gotten around to putting the new weather stripping in there either. So yes, That’s a towel Chris closed into the top of the door that night to stop the whistling.
But the one wall looks great! Right?! 🙂
It’s so so sososo nice to have all this space to organize our stuff now, but I really did still have to edit out a lot to get these cabinets to look and function the way I want them to. Let me give you the tour!
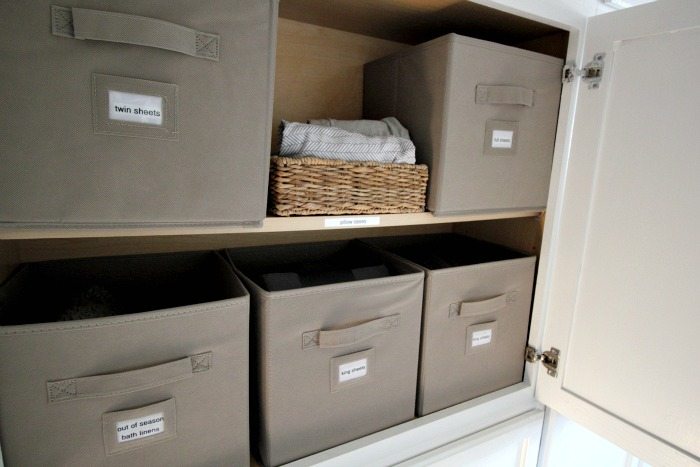
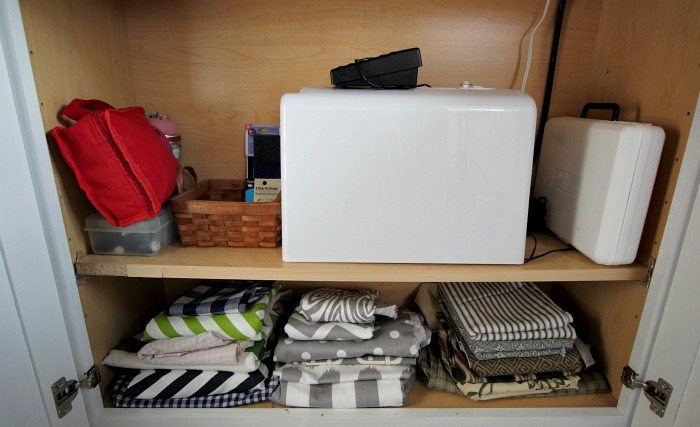
This cabinet holds all of our sheets and a few extra seasonal bath linens. Each size of bed gets its own bin and then I keep the pillow cases in a separate little basket in the middle just cause I like to change the pillowcases on the beds a little more often than the sheets. I love these fabric bins because they keep everything looking impeccably tidy if you don’t want to spend a long time fussing over folding your sheets perfectly and they’re a super cost-effective solution.
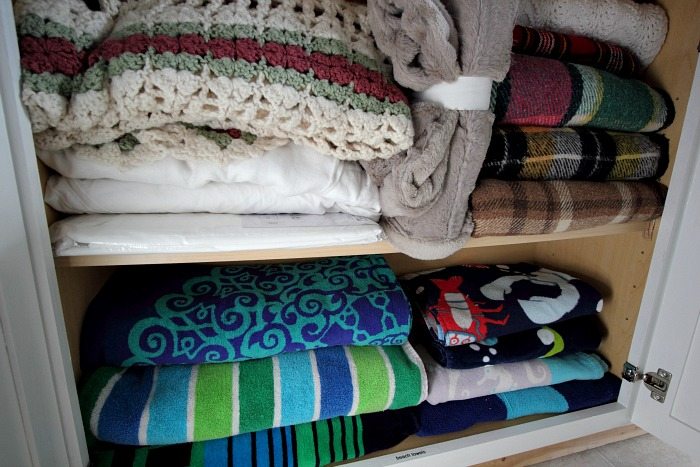
We plan on adding another row of cabinets inside the actual bedroom eventually and you can see that we need them! Like a lot of old houses, we don’t have a linen closet so I definitely need somewhere to put my collection of plaid blankets and other various forms of blanketry. I have a few here and a few in a giant basket. I’m also pretty fond of beach towels, and we always seem to go through them so quickly in the summer, so I think I’ll probably need this whole cupboard for them soon. But it works for now, even if it’s pretty jammed-full in there.
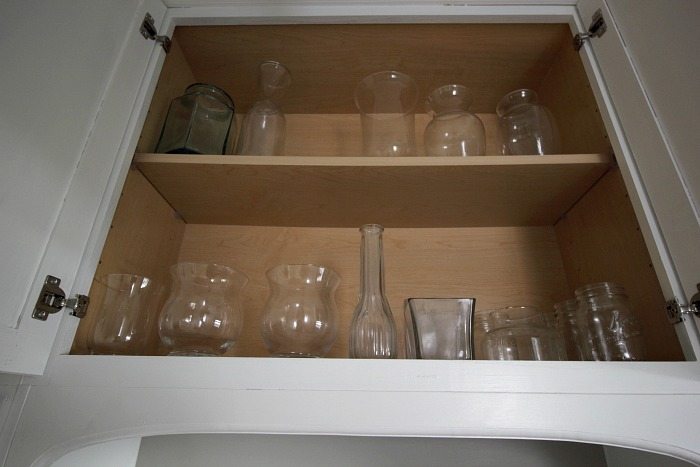
Clear glass vases of different shapes and sizes are always handy to have around so I keep those in this cupboard.
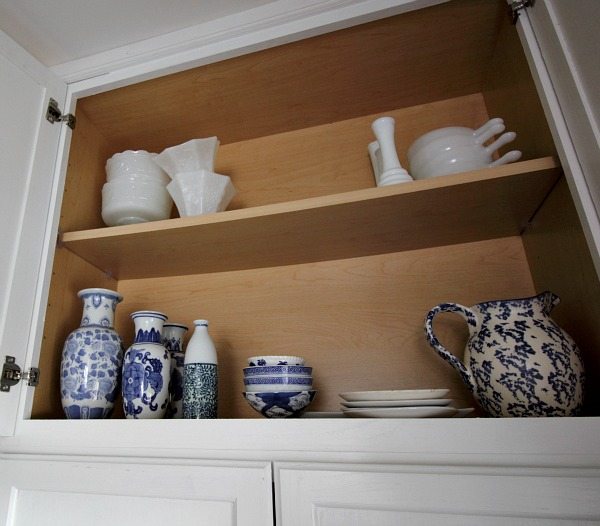
… And then I have this cupboard for my milk glass and my blue and white stuff. You can see that some of my vases are currently in-use and that’s why there are some gaps in there. 🙂
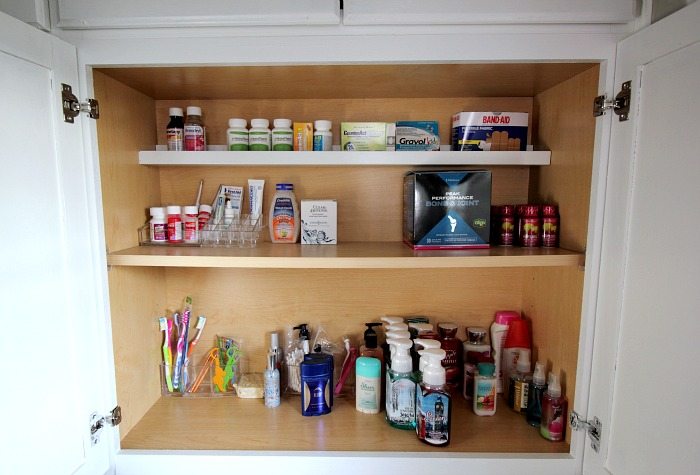
This cupboard is right directly across from the bathroom door and it holds all the extra medicines, vitamins, and toiletry type stuff. You can see that it’s not particularly full and that’s because we have so much storage in the bathroom itself now, but I still really like having this extra space out here. We added in a Ribba picture ledge from IKEA above the top shelf to give me a nice little spot for small bottles so they don’t get lost in a big jumble. You could also use this one, which is exactly the same, only sized-perfectly to fit into a 36″ cabinet instead of making your husband run out to the garage in the snow to cut it down for you. 🙂

I also picked up a few of these clear acrylic cosmetic organizers to use for storing all the little things that seem to accumulate when you’re taking care of a family. So many tiny bottles, medicine droppers, and etceteras!
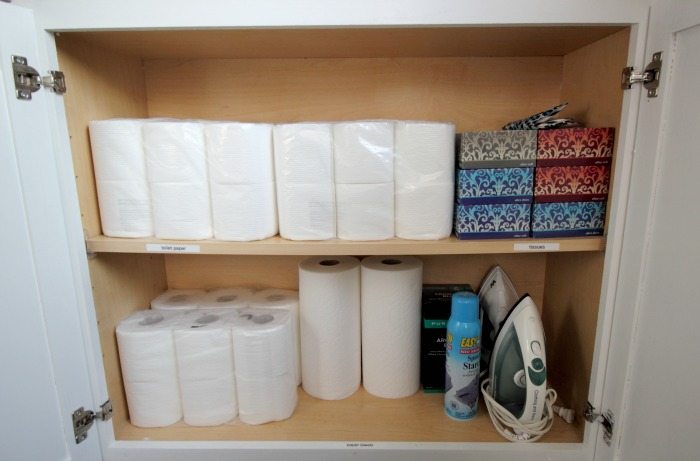
This cupboard holds paper supplies and the ironing stuff for now until we get another storage solution for that sorted out. It’s always a work in progress around here! This cabinet is probably my favorite though because I just love being all stocked up on the necessities like this, and knowing that we’re not going to run out or be caught having to run to the store late at night for something silly like toilet paper. Plus, isn’t there just something about crisp, white paper products?
Related: The Five Finger Trick for Controlling Clutter
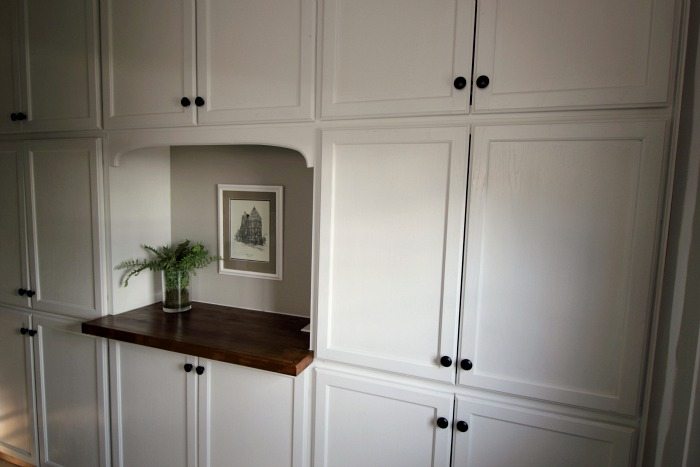
One of the neat things we did with this wall o’ storage is incorporate a “sewing room” into one cupboard. All of my sewing stuff fits into one cupboard and then when I’m ready to work on a project, I just bring my sewing machine up onto the counter, pull up a chair, and go!
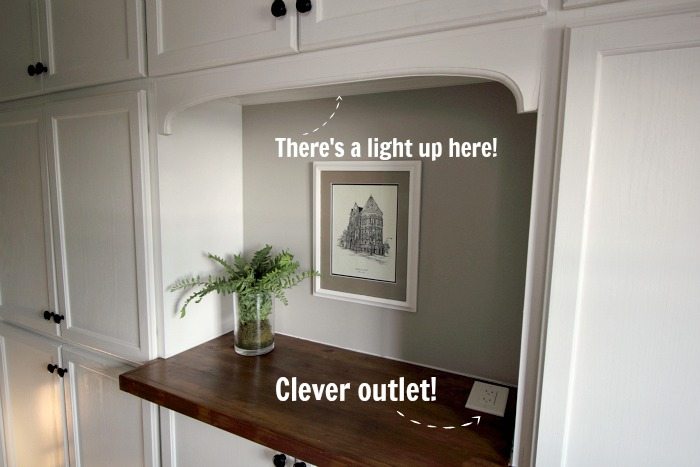
It’s so handy to have the outlet that Chris built right into the countertop and the light up above!
If you want to build something like this on a blank wall in your home, it’s actually pretty simple!
You just need to pick up some basic in-stock upper cabinets from your local hardware store (ours were unfinished oak and I just painted them), build a basic frame on the floor from 2×4’s to raise your cabinets off the floor a litter, and then attach them to the wall and each other! We had a space that would fit 9 cabinets almost perfectly, so we used 8 and left that little nook in the middle for the counter. We made our own faux butcher block counter, just like we did on the long counter in the laundry room and I just love the warmth it brings to this back hall. We trimmed the whole thing out in a few places, but mostly we just needed lots and lots of paint to make the whole thing come together beautifully!
It’s actually a pretty simple project that has a really big payoff, and it’s really really easy when you compare it to some of the other built-in projects we’ve done in this house in the last few years. If I hadn’t had a teeny little newborn baby home at the time, it probably would have actually been done in just a couple of weeks.
I’m so happy with the way this turned out and, as always, I can’t wait for the next time we get a chance to add some beautiful extra storage space somewhere else!
Have you ever built a big wall o’ storage like this in your home?
MORE IDEAS LIKE THIS
- Thrift Store Organizing Supplies
- Timeless Farmhouse Mudroom Refresh
- How to Refill a Plug-In Air Freshener
- How to Clean an Iron
- The Creek Line House Homekeeping Archives
This post contains affiliate links. Thank you for supporting this website!

Courtenay Hartford is the author of creeklinehouse.com, a blog based on her adventures renovating a 120-year-old farmhouse in rural Ontario, Canada. On her blog, Courtenay shares interior design tips based on her own farmhouse and her work as founder and stylist of the interior photography firm Art & Spaces. She also writes about her farmhouse garden, plant-based recipes, family travel, and homekeeping best practices. Courtenay is the author of the book The Cleaning Ninja and has been featured in numerous magazines including Country Sampler Farmhouse Style, Better Homes and Gardens, Parents Magazine, Real Simple, and Our Homes.